How to enable Single Sign-On for RDS Terminal Server
How to enable Single Sign-On for RDS Terminal Server?
Single sign-On can be enabled using domain or local group policy.
- Log on to your local machine as an administrator.
- Start Group Policy Editor - "gpedit.msc".
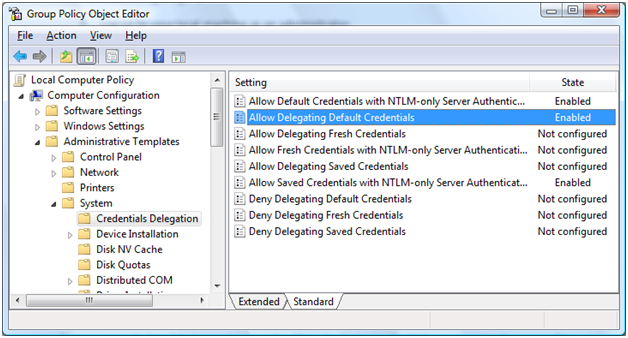
- Navigate to "Computer ConfigurationAdministrative TemplatesSystemCredentials Delegation".
- Double-click the "Allow Delegating Default Credentials" policy.
- Enable the policy and then click on the "Show" button to get to the server list.
- Add "TERMSRV/
" to the server list. You can add one or more server names. Using one wildcard (*) in a name is allowed. For example to enable Single Sign-On to all servers in "MyDomain.com" you can type "TERMSRV/*.MyDomain.com". (Notice the "Concatenate OS defaults with input above" checkbox on the picture above. When this checkbox is selected your servers are added to the list of servers enabled by OS by default. For Single Sign-On this default list is empty, so the checkbox has no effect.) - Confirm the changes by clicking on the "OK" button until you return back to the main Group Policy Object Editor dialog.
- At a command prompt, run "gpupdate" to force the policy to be refreshed immediately on the local machine.
- Once the policy is enabled you will not be asked for credentials when connecting to the specified servers.
What are the limitations when using Single Sign-on?
- Single Sign-On works only when connecting from an XP SP3, Vista or a Windows Server 2008 machine to a Vista or Windows Server 2008 machine.
- If the server you are connecting to cannot be authenticated via Kerberos or SSL certificate, Single Sign-On will not work. You can circumvent this restriction by enabling "Allow Default Credentials with NTLM-only Server Authentication" policy, which is less secure. (NTLM-only Server Authentication is less secure compared to using Certificates or Kerberos.)
- If you have saved credentials for the target machine they take precedence over the current credentials.
- Single Sign-On works only when using domain user accounts. Please see section below regarding user experience for non-domain clients.
- If the Terminal Server connection is configured to go through a TS Gateway server then in some cases the settings of the TS Gateway server can override the TS Single Sign-on setting.
- If the terminal server is configured to Always prompt or RDP file setting Always prompt, then Single Sign-on to TS will not work.
- Single Sign-on only works with Passwords. Does not work with Smartcards.
Why is Single Sign-On controlled by Group Policy?
As a part of the logon process TS Client sends the actual user credentials (user name and password) to the server. If a code running as a regular user were allowed to enable Single Sign-On, any malicious software (virus, Trojan, spyware etc.) running in the user's session would be able to send the user's password to any machine on the network. So, only administrators should be allowed to decide which servers are safe for Single Sign-On.
Thus Single Sign-On can only be enabled on domain-joined client machines.
What if I have Single Sign-On enabled but want to use different credentials this time?
Start TS Client. Click the "Options" button. Select the "Always ask for credentials" checkbox. You will be asked for credentials next time you connect.
How do I enable Single Sign-on for TS Gateway Server?
- On a Vista machine open up the "Group Policy Object Editor" by entering "gpedit.msc" at a command prompt.
- Navigate to "User Configuration", "Administrative Templates", "Windows Components", "Terminal Services", "TS Gateway" and select the "Set TS Gateway server authentication method" setting:
- Select the "Enabled" radio button.
- Under "Set TS Gateway server authentication method", click on the combo-box and select "Use locally logged-on credentials".
- If you want the users to be able to override this authentication method then select "Allow users to change this setting" checkbox.
- Confirm the changes by clicking on th e "OK" button until you return back to the main Group Policy Object Editor dialog.
- At a command prompt, run "gpupdate" to force the policy to be refreshed immediately on the local machine.
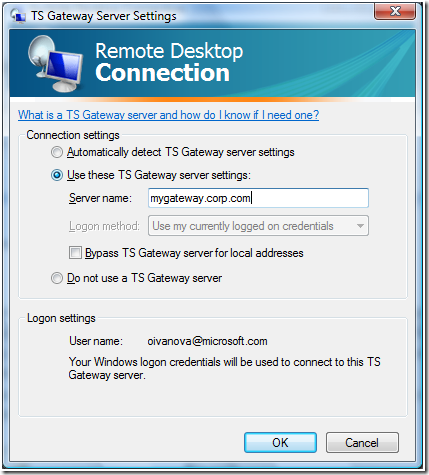
- Start up the TS client and navigate to "Options", "Advanced", click on "Settings" under "connect from anywhere". You should see the status text indicate the following: "Your Windows logon credentials will be used to connect to this TS Gateway server".
- That's it! The client will now be able to connect to the gateway server ("gateway.microsoft.com" in the above example) using locally logged on credentials. Of course, if you want to use another set of credentials, you should select the "Allow users to change this setting" checkbox in the Group Policy Editor in Step-5 to bypass using the locally logged on credentials.


